Creating and managing menus is simple using the default WordPress Menu Editor:
WordPress Dashboard > Appearance > Menus
There are two available menu layouts:
- Default Dropdown Menu
- Mega Menu — a default menu with wide dropdown layout
You can also create and add Menu Templates to both default dropdown menus and mega menus. Menu Templates are content layouts built with the Elementor page builder, similar to creating a regular page.
Once your menu is ready, assign it to any header via the Header Builder.
For header setup, see: How to Create and Edit Website Headers
Default Dropdown Menu
To create a standard dropdown menu:
- Go to Appearance > Menus
- Create or select a menu
- Add items (Pages, Posts, Categories, Custom Links, etc.)
- To create a dropdown:
- Drag items slightly to the right under their parent to nest them
- Supports up to 3 levels

Appearance > Menus

Example: Default Dropdown Menu
Mega Menu
The Mega Menu is the same as the default menu but allows you to create wider layouts with multiple columns, using the default WordPress Menus functionality:
Enable Mega Menu
In Appearance > Menus, open the desired top-level menu item
Check Enable Mega Menu

Top-Level Menu Item > Enable Mega Menu
Set Mega Menu Width
Click Menu Item Options
Select your preferred Mega Menu Size (Full Width, Container Width, etc.)

Menu Item Options

Mega Menu Size Option
Add Columns & Items
To add a column inside a mega menu:
- Add a Custom Link (use
#for URL, enter desired column title in Link Text) - Nest it under the main Mega Menu item (second level)
- Check Convert to Column Item
- Adjust column width, padding and border. You can also hide the column title
The Mega Menu layout is based on a 12-column grid.
If total column widths exceed 12, columns will wrap to the next row.
To add links inside the column:
- Add menu items as third-level items under the column item
- These appear as regular links in the column

Add Column Item
Add Multiple Headings in a Column
You can add multiple titles in the same column:
- Add a menu item under the column
- Open Menu Item Options
- Set it as a Heading Item
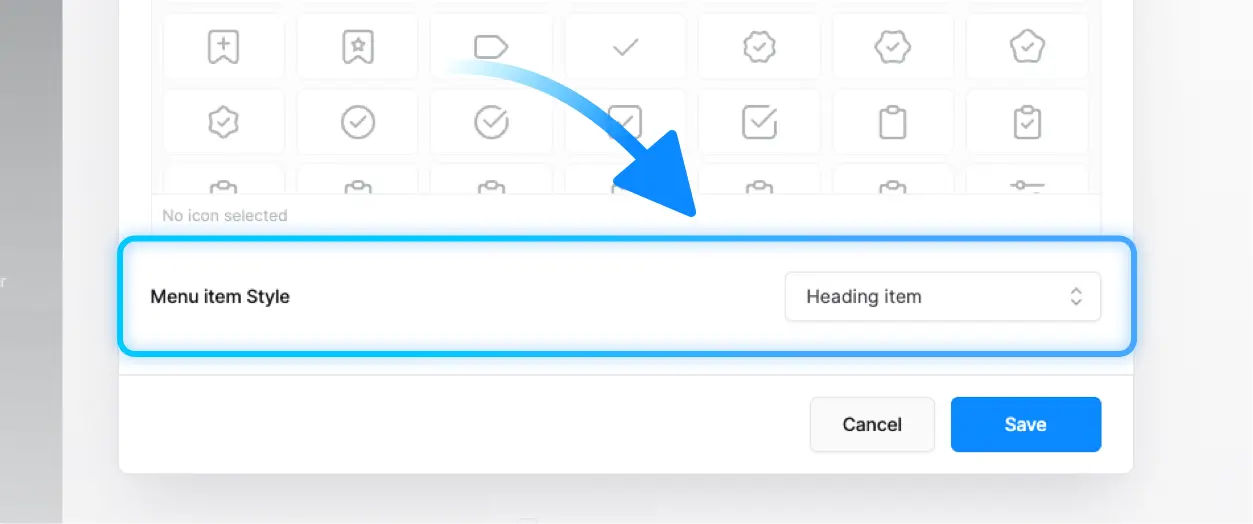
Menu Item Options > Menu Item Style

Example: Multiple Headings in a Column
Add Icons to Menu Items
To add icons:
- Open Menu Item Options for any item
- Select an icon from the icon library
Icons will not display for items converted to Box Items
Menu Item Options > Icon
You can create banner-style menu items in the Mega Menu using Box Items:
- Add a sub-item under a column
- Open the Advanced menu item Options
- Enable the option Convert to Box Item
- Set the Title, Text, and choose an Image
- Customize the box height, style, and text color as needed

Add a sub-item under a column > Advanced menu item Options

Enable Convert to Box item option, then set the title, text, and choose an image

Example: Mega Menu Structure Overview

Example: Mega Menu with Banner
To use a video background instead of an image:
- Copy the video URL (Self-hosted .mp4 files only).
- Paste it in the Background field of the Box Item
YouTube and external video services are not supported
Example: Mega Menu with Video Banner
Menu Templates
How to Add a Menu Template to a Dropdown Menu:
- Go to Theme Builder → Templates → Add New Template
- Create your template and customize the content using Elementor
- Navigate to WordPress Admin Panel → Appearance → Menus
- Add to your dropdown a new Custom Link item (set the URL to # and enter any Link Text used only to identify the item)
- Open the Advanced Menu Item Options panel
- Set Item Type to Template
- Select your previously created Menu Template
Step 5: Advanced menu item Options

Step 6 and 7: Advanced menu item Options > Item type > Template
Create a Custom Menu Popup
You can build your own custom menu layout using the Popup Builder. To do that:
- Create a new popup
- Add links and any additional elements you need
- Set the popup to open from a custom link in your header or page
This allows you to fully customize the menu experience with your own layout, styles, or design.
For detailed steps on how to create and customize popups, you can refer to this article:
You can also explore some great examples of premade menu popups available for import by visiting the Popup Builder preview page:
https://core.pixfort.com/popup-builder